
Ultimate Guide to Creating Realistic Cyberpunk Characters
Introduction — Creating Realistic Characters

Hello there! I'm Miguel Nogueira—a concept designer, artist, thinker, former graffiti artist, ex-graphic designer, problem solver, dreamer, and a few other things. I studied Multimedia and Digital Arts at ESAD, a college in Portugal. Currently, I'm working at Frictional Games, where I've been since 2017. While I also freelance for smaller studios, Frictional has been the cornerstone of my professional experience. We're now developing a new horror title, and I'm contributing to various aspects, from monster and prop design to character sketches, level concepts, 2D art, and storyboards.
The Cyberpunk Concept
The essence of this project was to blend elements from my life experiences and topics I find exciting. I once read an article on cybernetics and discovered that Wiener's reports and theories about information transfer between living beings and machines were essentially the same—there's a cycle of encoding, decoding, feedback, and learning. These theories attempt to understand the communication and control between machines, living beings, and social groups through analogies with electronic devices. In short, they argue that the only thing separating a human from a machine is semantics.
This sparked my desire to enhance my artistic skills and speculate on giving new meaning to this idea. I imagined a future where science, religion, and nature coexist in our world.
In this character design, spirituality remained a central theme. Despite being cyber-enhanced, the subcultural clothing is merely a form of self-expression—another subject I enjoy exploring.

Ultimate Guide to Research and Sketching
Finding references online and sketching is, for me, the most enjoyable part of the process. The more I draw and research cyberpunk, the more I discover about my character. The deeper I delve into ideas, the higher the chance of finding something valuable!
I used PureRef to organize my sketches and Photoshop for drawing. It's important to note that you can use any tool that allows you to sketch and gather references. Think with your mind, not the software—creativity isn't software-dependent!
I thought it would be helpful to explore different sketches. I already had an image of Wicca in mind—a modern urban witch representing a video game mage character—but I didn't want to settle on that idea immediately. I wanted to see if other concepts would work, so I started sketching different iterations of the character. I also shared screenshots with friends and asked if the concept and story made sense. I wanted to ensure it wasn't too wild, too weird, or too boring.
Note: Allow yourself to wander, experiment, forget what you know and design theories, and be fearless.

Creating Mood Sketches
I've already mentioned that this was a labor of love, and since I didn't impose a time constraint on myself, I enjoyed creating a series of mood sketches exploring the character's personality. I believe this helps me understand the character better and influences the final result.

Sculpting Cyberpunk Character Outfits in ZBrush
I love playing with ZBrush tools for sculpting. It never feels like work, and when this kind of energy drives the process, you sometimes achieve unexpected results.
I usually don't use many fancy brushes—just the default Clay, Dam Standard, Trim, and Polish brushes in ZBrush, along with some technical alpha maps to bring everything together.
The Clay brush is great for adding form without too much worry. It allows you to make mistakes, which is crucial for acquiring any skill you want to master. Trim and Polish brushes are excellent for hard surface forms, while Standard and Dam Standard brushes are great for carving some lines.
I often take parts of the model and export them for quick rendering, post ongoing work on social media, and send them to friends. This is useful for getting feedback on the overall quality of the product.

Clothing Guide
I'm not really an expert in Marvelous Designer, but it's the tool I use and the fastest way to get quality clothing. It's excellent for simulating folds, and doing the same in ZBrush would take a lot longer. As usual, I opened my reference board on a second monitor and constantly tested whether the clothes matched my references and sketch designs.
Realistic Rendering and Texturing
For rendering, I use KeyShot and its material graph to quickly create realistic textures without worrying about UV maps or other tool-related constraints. All I need to do is import the model into the scene and start importing the next texture.
I already have a realistic shader library from previous cyborg concepts, so it's just a drag-and-drop process.
Illustration isn't really my forte, so naturally, I started with Illustration to relax while working on the surrounding environment later (this is my comfort zone). I also wanted to improve in drawing, so avoiding working on my weaknesses and sticking to what I already know would be pointless. The project's scope didn't really shrink; it regressed as I wanted. The model included a different storytelling format not accessible from just one perspective.
A mix of digital painting, photography, and KeyShot materials:

Cyberpunk Accessories
Adding accessories was the easiest part. The nose ring is a torus, just like the ear plugs, which are modified spheres. Bags and clothes were a mix of IMM ZBrush and Marvelous Designer. My idea was to improve graphic readability, so adding tattoos played a significant role. The giant 'X' tattoo on the side of her head was also added for better graphic readability and because it felt right. The latter is often a more important reason because when we create art, the feeling must be there.
My main concern was adding technical and hard surface elements without making the character look like just another cyborg. There are many great video games and movies with incredible visual languages, but I wanted to go further and explore the character more deeply. I thought about piercings, tattoos, pouches, tattered clothes—anything that would better tell her story. Does her jacket have tattered edges because it got caught while she was being chased? Asking such questions is a great way to enhance the design.
Texturing
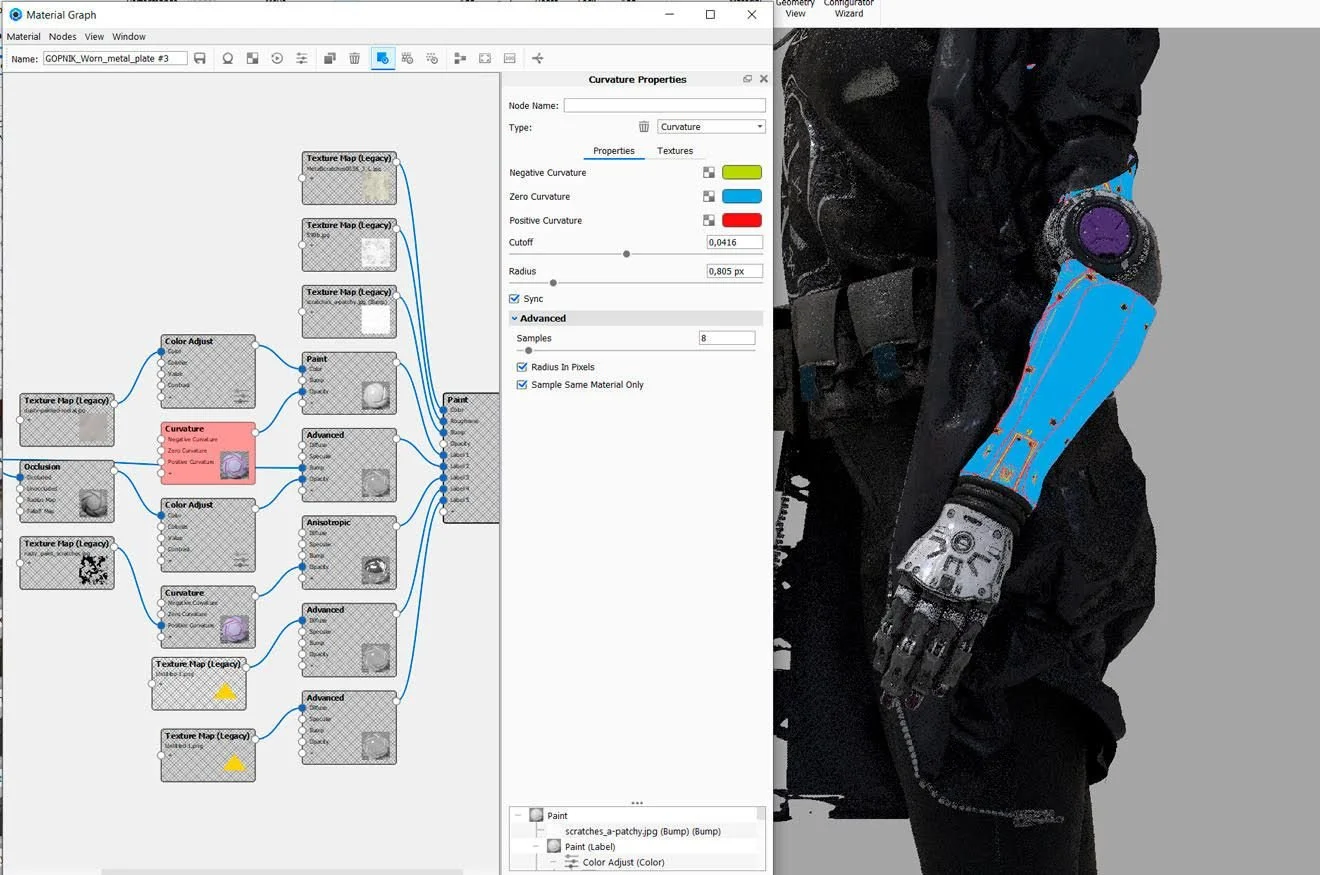
Most of the edge wear and texture work was done within KeyShot using a material graph. I also usually overlay a very thin metal texture on top of the base render to add some variety. As you can see in the graph, I stack different Labels, which work like layers, and with each added label, I use a curvature map to mask some of them. A curvature map finds all the edges and faces within the mesh and separates the edges with colors. After that, I can mask the curvatures I don't want. To better illustrate my purpose, I added red. I gave yellow and blue colors to each curvature. If I wanted to mask the blue curvatures within the textures inside the label and hide everything, all I had to do was make it black. If I wanted it to be visible, I'd paint it white, and if I wanted subtle masking, I'd play with grays. Looking at it now, since the edge wear looks a bit linear, I think it could be a bit more complex by blending each curvature color better using the cut sliders.
Ultimate Techniques for Post-Production

In KeyShot, I usually start with very basic lighting and then continue by adding textures and adjusting lighting in Photoshop. The pentagram was created as an experiment in KeyShot: I used a wireframe shader, then fine-tuned it to give it a holographic look. During this process, I kept checking holograms on Google to ensure it sat on something. I was going to add a photo or just paint it, but it turned out that doing this in KeyShot was really easy. The most important part of this workflow is a simple painting process that helps eliminate the 3D look.
Useful Tips on Creating Cyberpunk Characters
The best way to create a standout character is to craft something that reflects your personality. I've truly dedicated my life to my work. While creating Wicca, I remembered some friends who reminded me of the same style. I used to be goth and wore dreadlocks, piercings, and tattoos. I'm trying to tell stories about myself and people I know—not just my soul but also the souls of my friends. And I believe everyone has a unique story to tell.
This is really important because the market tends to reward success, and today's success can take various forms, from stylized cartoonish characters in post-apocalyptic settings to colorful designs.
Often, copying Syd Mead or what's popular on ArtStation might bring some attention to your work, but truly standout pieces are personal works that only the artist can tell, bearing the artist's own signature.
Don't be afraid to be yourself, resist everything the market deems successful—especially if you're not hesitant to do so. Remember why you started this career. The work you produce today will shape your future.
By following this detailed workflow, you can create compelling cyberpunk characters using ZBrush and KeyShot. Whether you're a fellow creative or a potential collaborator, I hope this insight into my process inspires and informs your own projects.
Feel free to share this article, and if you're interested in collaborating or have any questions, don't hesitate to reach out!